Showing posts with label tutorial. Show all posts

Tuesday, 31 January 2017

Orange Vibrations - How To Recreate the Makeup Look from Giorgio Armani Prive Spring/Summer 2017

I often get emails from the high end beauty brands I work with, outlining how they did the makeup look for this or that starlet on the red carpet or, more excitingly, looks that are fresh off the runway. Show makeup is always my favourite. Particularly when it treads a careful and thin line between wearable and fantastical.

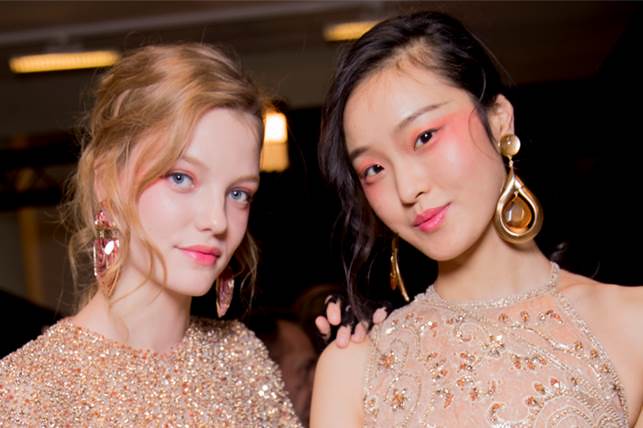
Giorgio Armani Prive SS17 was exactly that; a peachy pretty look that is not dissimilar to a marriage between the Igari makeup trend and something plucked from a sci-fi film. The dewy skin, rose-petal lips and light brows are all important but the key element is the orangey-pink blush tones carried around the eye and over the tops of the cheeks. For Spring/Summer, it is an incredibly light, sweet, suitable and somewhat fairy-like look.

Best of all? It's actually pretty wearable (IMHO). In fact, I followed the steps and wore it out to a friend's birthday dinner the other night.

Linda Cantello, International Makeup Artist at Giorgio Armani describes it as "A new take on orange" and goes on to say that it offers "a fresh vibrant Summer face."

image004
@ Kevin Tachman for Armani Beauty

Here are her steps to recreate it for yourself.

1. Prepare and massage skin with the Armani Prima Glow-On Moisturizing Balm (or any rich moisturiser you have on hand), ensuring the cream is absorbed before adding the base.

2. Use a concealer and foundation to correct natural skin tone, matching it to the color of the neck. Cantello suggests pairing their High Precision Retouch and new Power Fabric foundation.

3. For the main action, apply some Lip Maestro Notorious (In the shade #301) or any peachy cream blush widely on  cheeks & eyelid, making sure the angle from the brow bone down to the cheek is clearly defined. If needed, redefine the shape with a concealer.

4. Fill in the eyebrows creating a straight line.

5. Intensify the eye by adding a slight shadow from the inner corner to the brow with a taupe-coloured brown gel product such as the Armani Eye & Brow Maestro in 02 “Wenge Wood”. Then add a thin line of black eyeliner as close as possible to top lashes. Use finger to extend outer corner.
Apply a mascara such as the Eccentrico mascara in “Obsidian Black” to the top lashes only.

6. Mix lip shades in peach and rose tones such as the Lip Maestro Notorious shades 301 and 515 and gently dab onto lips.

7. Finally, powder at the end using a product such as the Luminous Silk Compact for a matte finish.


20170124_ARMANI_PRIVE_0169
@ Kevin Tachman for Armani Beauty


20170124_ARMANI_PRIVE_1956
@ Kevin Tachman for Armani Beauty


*

Liked this post? Want more?

Follow me here using google friend connect or bloglovin.

Or follow me on tumblr - twitter - facebook - instagram.


Tuesday, 16 September 2014

Burberry SS15 Makeup Look

So, to unwind when I arrived home today, I sat and watched Youtube videos with a cup of tea. Two of my favourite Beauty bloggers/vloggers, essiebutton and ViviannaDoesMakeup, had both uploaded videos comprising of behind-the-scenes at Burberry SS15, the show, the makeup and how to do it yourself. Sometimes, these runway looks strike me so much, I need to try my hand at them (like this one from Chanel last year)! So, with two videos on the topic watched and my makeup spread across my bed, I set to work!

Sadly, I didn't have all the Burberry swag necessary to create the look but, as is often the case, I improvised. Here's what I supplemented the products with and the two tutorials from the gals!


(Images via vogue.co.uk)


So, for the base, to get the dewy, sunkissed look, I pumped a bit of Maxfactor's Facefinity Primer on the back of my hand and mixed it with Philosophy's Divine Illumination before applying with my fingers. Then I used Dermalogica's Sheer Tint in Light as a BB with the right amount of coverage and dewiness. Lastly, I used Shiseido's Concealer to cover blemishes, for under the eye and along the bridge of the nose.

Next. I filled in my brows with Benefit's Brows A-Go-Go and Billion Dollar Brows' Hint of Tint in Taupe.

Then I loaded a brush with the matte shade of Tan Organic's Bronzer and applied it to my eyelids. I also used this as a contour under my cheekbones.

Lastly, I mixed two shades of lipstick to try and emulate that gorgeous Ruby shade from Burberry - Topshop's Vamp and Rimmel's Kate in 01. I applied a coat of the Rimmel with a lip brush and applied the Topshop over to deepen it and then patted a little directly from the tube on top.

And voilĂ ! Kinda the same thing, right?


Enjoy, and have fun with your look. I mean, who even needs mascara, right?

Monday, 28 July 2014

A new BB cream + giveaway.

As I mentioned briefly in a previous post, I'm not a fan of high-end BB creams. I've tried a bunch, some by Benefit, Mac, Stila amongst others, but none have stood up to their price-bracket or my loyalties to drugstore versions. I'm under no illusions that they don't all pale in comparison to Korean versions but I've yet to find the right shade to confirm or refute this. For now, I can merely state that my first was Garnier's Miracle Skin Perfector which I continue to love. Then I tried Maybelline's Dream Pure BB which has Salicylic Acid and is, therefore, great for breakout riddled skin.


The latest I've begun to use is Rimmel's BB Cream which has the highest SPF at SPF 25. This is one of it's best selling-points for me, as is the smooth formula. However, I find that it has slightly more coverage than I want when I'm reaching for a BB cream - to me, a BB cream is for a no makeup look. For those who do want that extra coverage, it's probably the best drugstore BB cream out there for that. So, here's how I apply it and what I put with it.

1. As this has higher coverage and it's Summer, I use Aloe Vera as my primer. This is an excellent natural alternative for a primer with anti-bacterial properties that are great for blemish-prone skin. Using it instead of a regular primer extends the wear of the makeup without feeling caked in product.


2. I take a relatively small amount of the cream on the back of my hand and use my fingers to apply it. The heat in my fingertips helps blend it very naturally and evenly into my skin. I start at the middle of my face and move outwards in arching movements with the natural line of my bone structure.


3. I fill in my brows with powder from Benefit's Brows A-go-go, keeping the look fairly minimal and the brows relatively small. Then I add a little of Mac's Mineralize Skinfinish Give Me Sun into the hollows of my cheeks and along my jawline for definition and finish with Maxfactor's Creme Puff Pressed Powder on top. 


4. Using the Naked 3 palette I brush a little of Strange onto my brow bone and inner eye as a highlight. Then I cover two thirds of my eyelid in Dust before working Buzz into my crease and outer corner.


5. I now curl my eyelashes with Eyeko's curler and brush a couple coats of Seventeen's Superlash to the outer edges of my upper lashes to give a natural yet feline flick to my eyes.


Et voilĂ !


Like the look of the Rimmel BB Cream? Well, I've three to give away! Sadly, I only have them in the shade Light but I promise to get more varied shades next time! 


So, how do you win? Comment below telling me your go-to base (BB or otherwise) and make sure you're following me on at least one of Facebook, Twitter, Instagram, Google Friend Connect or Bloglovin (or all of  'em if you're feeling super-generous). Mention in the comment which one applies to you and your handle on that site so I can track you down if you win! This giveaway is open internationally to anyone (those under 16 need to get a guardian's permission to send me their address) and will close 11th of August at 00:00 GMT + 1:00.

Good luck x

EDIT: As some peeps were having difficulty commenting here I've opened up entry via comments on facebook/twitter etc as well.

Thursday, 15 May 2014

Jem-inspired Makeup!

Jem, Jem, Jem, Jem, Jem, JEM!

They're making a movie! Argh!!! Old news, I know, but I'm so excited and have been consistently so since they announced it!

Jem came to me in an edited movie form on VHS in the nineties. My poor parents didn't realise what they'd let themselves in for by buying a random tape for me. I was obsessed. The songs, the all-girl band, the costumes, the adventures! It was rad. And Jem was a perfect heroine - kind, unselfish, talented, humble, glamourous and more than capable of defending herself while running a record label and secretly being a superstar. Everything I wanted to be.

The love for this cartoon that came out before I was even born has stuck with me. When I was studying for my Italian oral final exam two years ago, I rewatched the whole series (not the edited movie) in Italian. I know the words to the theme tune in Italian AND English.

I am, indeed, that cool.

But nerdiness aside, I always come back to the glamour and fashion of Jem. The eighties, clothes-wise, are not my thang but Jem and the Holograms' wardrobes spoke to me. The makeup too - so dramatic - worked on the perfect and lovely Jem. Which is what inspired me to recreate her most iconic makeup look, a lesser known one and a tamed down modern-day Jem look.


Here we go!

I got my most Jem earrings ready to go (by Betsey Johnson).


1. Glitter and Gold Jem.


I changed this up a little. While I stuck with the premise of a dark purple over the upper lid and pale purple below the eye with thicker brows and pale pink lips, I altered the shapes a little. As Jem is a cartoon character, she got away with eyeshadow right up to the brow. That's a little cartoonish for me so I made it into a cateye flick instead.

(Base was just Maybelline Dream Pure BB applied where a little coverage was necessary with a concealer brush and a Maxfactor Translucent setting powder on top at the end)

1. First I primed my lids with That Gal by Benefit. I could have used an eyelid specific primer but this works just as well for me. Multi-use is good use!

2. Using my Benefit Brows A-go-go kit, not for my brows but for the highlighters, I took the powder first. This I applied to my brow bone and on the tip of my nose to make it look cute.

3. The other highlight was then applied to my inner eyes as per the instructions on the pack but I also use it to highlight my cupid's bow and draw flattering attention to the mouth.

4. I then took a duo from bareMinerals in the shades Muse and Passion and applied Muse all over my eyelids.

5. Next I took a darker purple from a Primark palette and applied this over 2/3 of the eyelid, blending out.

6. The Passion shade then went on the outer corners of my eyelids and was used to build up the cateye shape.

7. I then took a Rimmel single  in the shade Iris and applied this under the eye in a thick semi-circle, aiming to get the truest, most pigmented colour. 


8. To finish, I applied a couple coats of Primark's Volume Boost Mascara (which is AMAZING), mainly focusing on the outer corners to accentuate the cateye. I filled in my brows with a Clinique eyepencil in Brown Sugar which I like to use for eyebrows as it gives a thick, fuller shape. And, finally, I applied a light pink lipgloss from Fearne's Boots collection.


2. Iconic Jem.


So, this look is all about those dramatic, iconic pink eyes. And really, it's quite simple.

1. Find a pink enough shade. It's quite difficult to do to make it stand out and not look like bruising on your face! I ended up using a random brandless blusher I've had for ages.

2. Outline the shape you want. Again, I altered the "to your brow" thing and created rounded shapes towards the outer edge of the brow only, taming it somewhat. I then marked the spot on my cheek I wanted the lower point to hit and connected this to the inner and outer corners of my eye in curved lines.

3. Fill this in and build up colour. You'll need to layer on the eyeshadow to get the desired effect. It takes a while but it'll look even sillier if you half-ass it!


5. To finish, just line the upper lash line with a Jet Black liner from Rimmel and plump up the lashes as much as possible with Rimmel's Scandaleyes mascara.

3. Wearable Jem.


And here we bring Jem into the 21st century! Perhaps not a look for the everyday but a little more wearable!

1. Take a pale pink, such as this one from an Oriflame duo that I had, and use it on your brow bone.

2. Take a dust rose pink such as this No. 7 in Antique Rose and apply all over the lids.

3. Apply a bright pink like this one from a Catrice quad I had to 2/3 of the lids, blending out.

4. Take some glitter and apply this over the top of it all, right up to the brow.

5. Continue the pinky tones in a nude variation on the lip with Clarins' Eclat Minute Embellisseur Lévres and a peachy shade on the cheeks with Nars' Deep Throat (I know, I know).


6. Create a graphic cateye with a cream shadow such as Topshop's Darkness and use an eyeliner brush - this gives much more control over the shape than by just using a pencil etc. It's a nice touch that this shadow has glitter to add more of it to this look.

7. Finish with a decent serving of L'Oreal's Mega Volume Manga Eyes in Violet for more Jem tones.

And, if you really wanna be Jem for a night, use some hair chalk to temporarily have the pink hair you've always dreamed of!


Whacha think? Will you give Jem a go?

Monday, 24 March 2014

TanOrganic Love and Use.

I'm not a fake tan kind of girl, I have to say. However, I do approve of the people who might be willing to burn, using it instead. I also approve of using an Irish product which is the only organic fake tan in the world.


At the launch of their new bronzer, I got a few products which have become major faves. The tan went directly to my little sister who has received many a compliment since using it. And I've been using the bronzer, Argan oil and exfoliating mitt religiously.


The Argan Oil, or Oil Arganic (€24.99), - so witty - has quite a dent in it already! I use it in my hair on almost a daily basis, just pouring a little into my palms and running it through. It's also useful as a natural way to tame fly-aways. And I have to say, after using it for a while now, my hair is a lot better behaved and healthier looking. And less with the knots too! Though it can be used on your hair, it was primarily intended for the body and I also use it as a moisturiser after showering.  It smells lightly of lemons and oranges which is a major plus as well.


The Tan-Erase exfoliating mitt (€14.99) is cracked out a few times a week and my skin is always noticably softer afterwards with the combination of mitt and Argan oil. It's also not too rough. It removes the dead skin without agitating my skin.


I was going to say that the serious coup is the Bronzing Powder (€29.90) but that would be unfair to how much I love the Oil Arganic. However, the bronzer is gorgeous. First of all, the wooden packaging (reminiscent of Tarte products) is majorly cute and a lovely touch. The shades are so beautiful - a matte cocoa brown and a shimmer sandy colour. This product is a great multi-use - something I always approve of. I use it for bronzer, contouring and eyebrows. 

Here's a quick outline of what I do.

1. Start with unadorned face as I did today.


2. Load a blusher brush with the matte shade.


And contour! I do a '3' shape on my face, starting at the temple, tracing down under the cheekbones and then around the jawline.


PS Sucking in my cheeks helps me find those wily cheekbones!

3. Using the same brush (I don't bother switching), I dust the shimmer shade over my cheeks, forehead, nose, chin, neck and chest.


Again, the silly face to make sure I'm on track.


Notice a difference yet?

4. Using an eyeshadow brush loaded with the matte shade, I fill in my brows.


5. I may also use this brush and shade to shape and contour my nose. I apply to the sides of the nose, up towards the inner edge of the brow and blend the crap out of it!


How about the difference now?

6. I then use a different eyeshadow brush with the shimmer shade to highlight the centre of the nose, under and above the eyes and the philtrum. If I'm not wearing full-on makeup, I'll use the same shade for a splash of colour on my eyelid.


All that put together looks like this.

If I am wearing BB cream it goes on before any of this. However, if it's a light, s/s look I just add concealer to relevant areas and powder over the entirety. I'll also probably add a lip balm and some mascara. Which then looks like this:


So, there you have it - products I've been loving and how I use them. Sorry this post was so full of pictures of my face! 

Have you tried any of the above? What did you think?